Appliance Longevity: Extend Lifespan by 3 Years with 4 Simple Tricks

Insider Knowledge: How to Extend the Lifespan of Your Appliances by 3 Years with 4 Simple Maintenance Tricks
In our modern lives, household appliances are more than just conveniences; they are essential workhorses that keep our homes running smoothly. From the refrigerator that preserves our food to the washing machine that keeps our clothes clean, these devices represent significant investments. The thought of replacing a major appliance every few years can be daunting, both for our wallets and the environment. But what if there was a way to significantly extend their operational life? What if you could add not just months, but years, to their service?
The good news is, you absolutely can. With a little insider knowledge and a commitment to simple, routine maintenance, you can dramatically increase the longevity of your home appliances. We’re talking about extending their lifespan by three years or more, saving you thousands of dollars in replacement costs and repair bills. This isn’t about complex repairs or needing a technician on speed dial; it’s about understanding and implementing four fundamental maintenance tricks that often get overlooked.
This comprehensive guide will delve deep into these often-underestimated practices, providing you with the actionable insights you need to become the master of your home appliances’ destiny. Get ready to transform your approach to home maintenance and enjoy the benefits of more reliable, efficient, and long-lasting appliances.
The Hidden Cost of Neglect: Why Appliance Lifespan Matters
Before we dive into the ‘how,’ let’s briefly touch upon the ‘why.’ Why is focusing on Appliance Lifespan Extension so crucial? Beyond the obvious financial savings, there are several compelling reasons:
- Environmental Impact: Every appliance that ends up in a landfill contributes to electronic waste. Extending an appliance’s life means less waste and a smaller carbon footprint.
- Reduced Stress and Inconvenience: A sudden appliance breakdown is never convenient. It often leads to spoiled food, piles of laundry, or a disruption to your daily routine. Proactive maintenance minimizes these stressful events.
- Optimal Performance: Well-maintained appliances don’t just last longer; they perform better. They run more efficiently, consume less energy, and deliver superior results.
- Safety: Neglected appliances can sometimes pose safety risks, such as electrical hazards or gas leaks. Regular checks and cleaning can mitigate these dangers.
The average lifespan of major appliances varies, but with proper care, most can easily exceed their manufacturer-estimated years. For instance, a refrigerator might be rated for 10-15 years, but with diligent maintenance, it can often serve you for 15-20 years or even longer. That’s a significant return on your small investment of time and effort.
Trick #1: The Power of Cleanliness & De-Gunking
It might sound overly simplistic, but keeping certain parts of your appliances clean is arguably the single most impactful thing you can do for Appliance Lifespan Extension. Dirt, dust, lint, and food debris are silent killers, leading to overheating, blockages, and excessive wear and tear.
Refrigerator Coils: The Unseen Energy Drainer
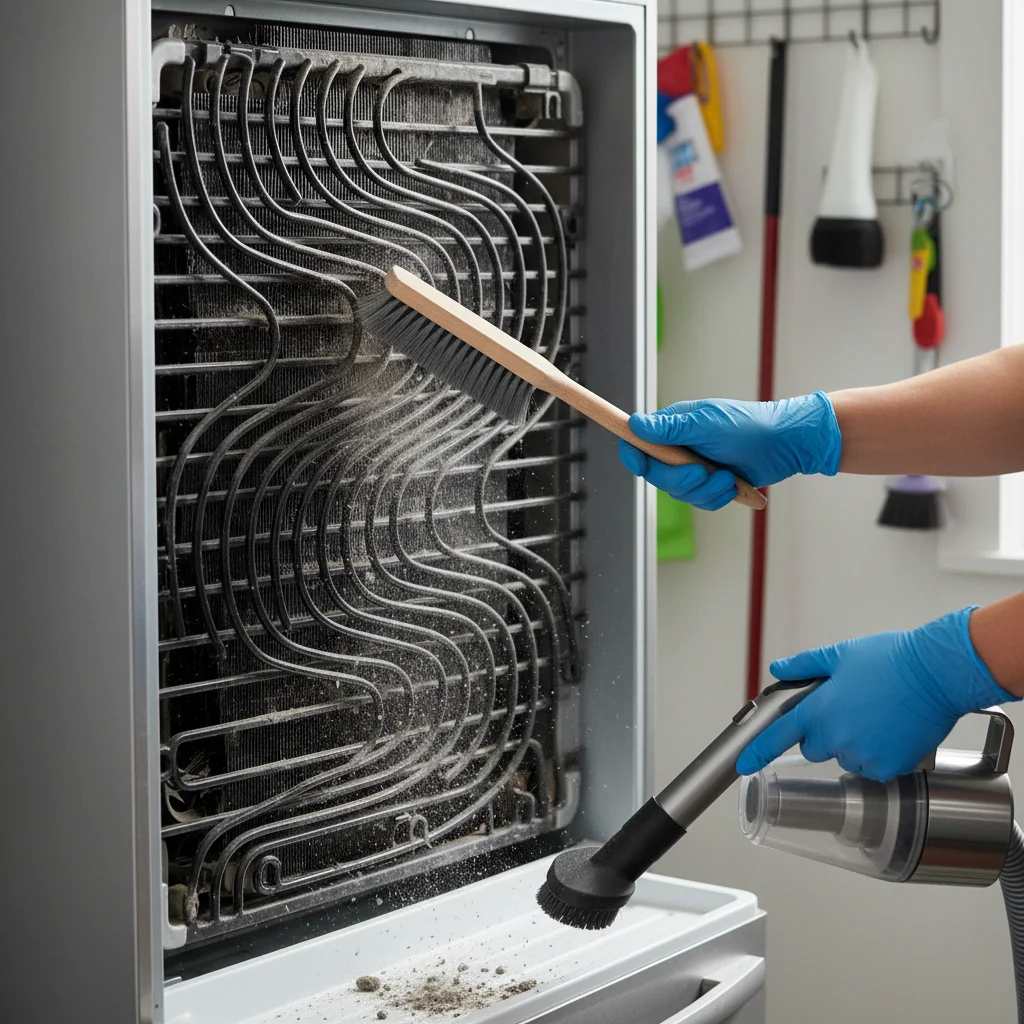
Your refrigerator’s condenser coils are like its lungs. Located either at the back or underneath the unit, these coils dissipate heat from the refrigerant. When they get covered in dust, pet hair, and grime, the refrigerator has to work much harder to cool, consuming more energy and putting a strain on the compressor. This is a primary cause of premature refrigerator failure.
How to Clean:
- Unplug the Refrigerator: Always prioritize safety.
- Locate the Coils: For most top-freezer and side-by-side models, they’re on the back. For bottom-freezer models, they’re often behind a kick plate at the bottom front.
- Vacuum and Brush: Use a coil cleaning brush (available at hardware stores) to dislodge accumulated dust, then follow up with a vacuum cleaner with a brush attachment to suck up the debris.
- Frequency: Aim for at least twice a year, or more often if you have pets that shed a lot.
Washing Machine & Dishwasher Filters: Preventing Blockages and Odors
These appliances deal with water and debris daily, making their filters critical for efficient operation and preventing clogs that can damage pumps and motors. Neglecting them leads to poor cleaning performance, foul odors, and eventual breakdowns.
Washing Machine Filter (If applicable):
Many front-loading washing machines have a small filter, often located behind a small panel at the bottom front. This filter catches lint, coins, and other small items that escape the drum.
- Consult Your Manual: Not all machines have user-serviceable filters. Check your manual first.
- Drain Water: Place a shallow pan and towel underneath before opening the filter cap, as some water will likely drain out.
- Clean Thoroughly: Remove the filter, clear any debris, and rinse it under running water.
- Frequency: Every 3-6 months, or if you notice drainage issues or strange noises.
Dishwasher Filter:
Most modern dishwashers have a removable filter assembly at the bottom of the tub. This catches food particles, preventing them from recirculating and redepositing on your dishes or clogging the drain pump.
- Locate and Remove: Twist and lift the filter assembly from the bottom of the dishwasher.
- Rinse and Scrub: Rinse under hot running water. Use an old toothbrush or small brush to gently scrub away any stubborn food residue.
- Frequency: Weekly or bi-weekly, depending on how often you use your dishwasher and how well you pre-rinse dishes.
Dryer Lint Trap & Vent: Fire Hazard Prevention & Efficiency
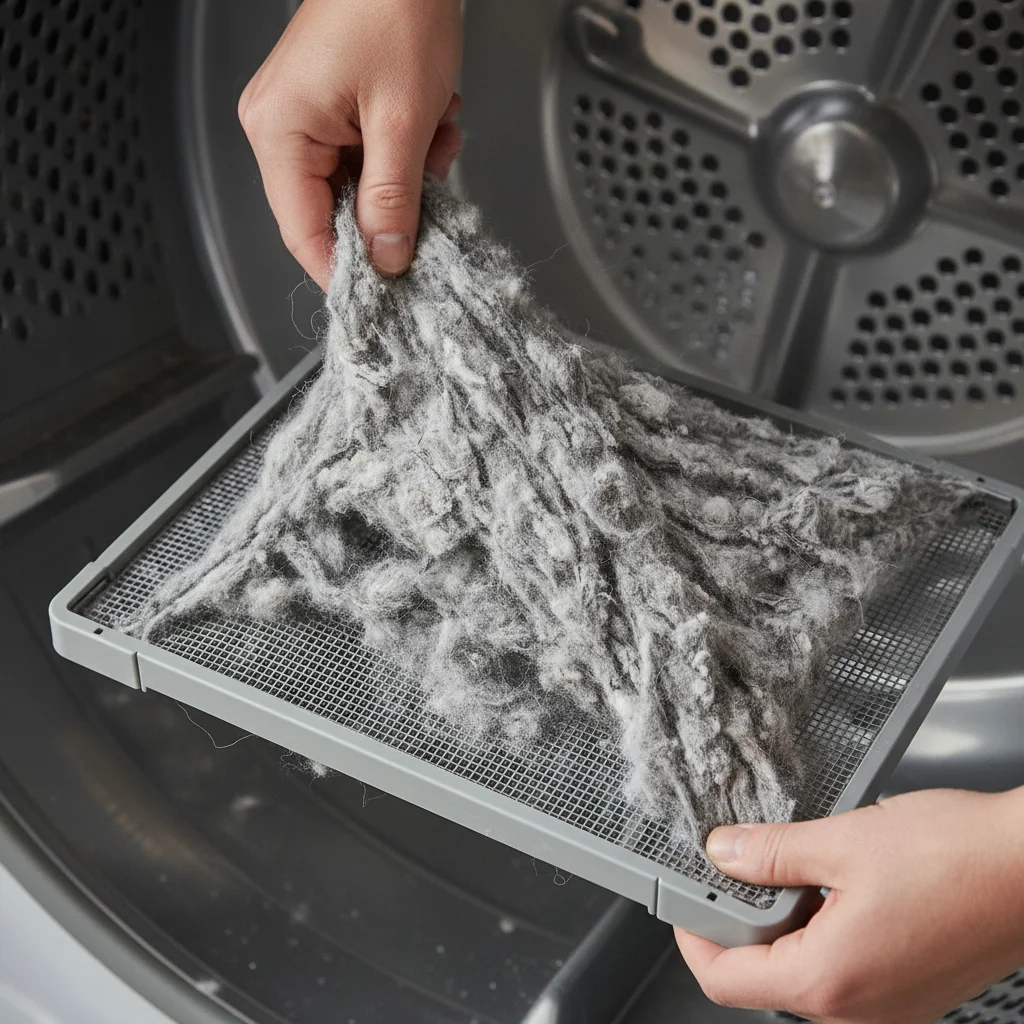
This is perhaps the most critical cleaning task for both appliance efficiency and home safety. A clogged lint trap and vent not only make your dryer less effective but also create a significant fire hazard.
How to Clean:
- Lint Trap (Every Load): Remove and clean the lint screen after every single load. This is non-negotiable for efficiency and safety.
- Lint Trap Housing: Periodically, use a vacuum cleaner with a crevice tool to reach down into the lint trap housing to remove any lint that bypasses the screen.
- Dryer Vent: This is the exhaust duct that leads from your dryer to the outside. Over time, lint accumulates here, restricting airflow.
- Professional Cleaning: Consider having your dryer vent professionally cleaned annually, especially if it’s a long or convoluted run.
- DIY Cleaning: You can purchase a dryer vent cleaning kit (consisting of a brush that attaches to a drill) and clean it yourself from the outside or inside.
- Frequency: Lint trap every load. Lint trap housing monthly. Dryer vent annually.
Trick #2: Respecting the Load & Usage Limits
Overloading or improper use is a common culprit behind premature appliance failure. Manufacturers design appliances with specific capacities and operational parameters. Pushing them beyond these limits puts undue stress on motors, bearings, and other critical components, drastically shortening their Appliance Lifespan Extension potential.
Washing Machines: The Weight of Overloading
Stuffing your washing machine to its absolute maximum capacity might seem efficient, but it’s detrimental. Overloading:
- Strains the motor and transmission.
- Prevents clothes from getting properly clean due to lack of agitation space.
- Can damage the drum bearings.
- Leads to imbalance, causing violent shaking and potential damage.
Best Practices:
- Follow Capacity Guidelines: Your owner’s manual will specify the maximum load capacity, usually in pounds or cubic feet.
- Leave Room: For top-loaders, don’t fill above the agitator. For front-loaders, leave about a quarter of the drum empty at the top.
- Balance the Load: Distribute items evenly to prevent imbalance during the spin cycle.
Dryers: The Damp Danger of Overstuffing
Similar to washing machines, overloading a dryer is a bad idea. It:
- Increases drying time and energy consumption.
- Puts a strain on the motor and heating element.
- Can cause clothes to remain damp, leading to musty odors.
- Increases the risk of lint buildup and fire.
Best Practices:
- Proper Airflow: Clothes need space to tumble and for hot air to circulate effectively. Load only until the drum is about half to two-thirds full.
- Separate Loads: Dry heavy items (like towels or jeans) separately from lighter items for more efficient drying.
Dishwashers: The Art of Proper Loading
While overloading a dishwasher won’t typically break its motor, it severely impacts cleaning performance and can lead to issues with spray arms and detergent dispensers.
Best Practices:
- Don’t Block Sprayers: Ensure dishes aren’t blocking the rotating spray arms.
- Avoid Overlapping: Dishes need space for water and detergent to reach all surfaces.
- Follow Rack Design: Load according to the dishwasher’s rack design for optimal cleaning and drying.
Trick #3: Water Quality & Supply Management
Water is essential for many appliances, but its quality and how it’s delivered can significantly impact their longevity. Hard water, excessive pressure, or improper connections can lead to costly damage.
Washing Machine Hoses: The Silent Time Bombs
The rubber hoses connecting your washing machine to the water supply are under constant pressure. Over time, they can weaken, crack, and eventually burst, leading to catastrophic flooding.
Best Practices:
- Upgrade to Stainless Steel Braided Hoses: These are far more durable and resistant to bursting than standard rubber hoses. It’s a small investment with huge payoff for Appliance Lifespan Extension.
- Inspect Regularly: Check hoses for cracks, bulges, leaks, or rust near the fittings every 6-12 months.
- Replace Proactively: Even stainless steel hoses should be replaced every 5-10 years as a preventative measure.
- Turn Off Water: If you’re going away for an extended period, turn off the water supply to the washer at the wall valves.
Dishwasher & Ice Maker Water Lines: Leak Prevention
Similar to washing machine hoses, the smaller water lines for dishwashers and refrigerator ice makers are also vulnerable to leaks.
Best Practices:
- Inspect Connections: Periodically check the connections at the appliance and the main water supply for any signs of drips or corrosion.
- Use Proper Materials: Ensure lines are made of durable, approved materials (e.g., braided stainless steel for ice makers) and not cheap plastic tubing that can easily kink or crack.
Water Hardness: The Scale Scourge
Hard water, rich in minerals like calcium and magnesium, can leave behind scale deposits in appliances that use water, such as dishwashers, washing machines, and coffee makers. This scale can clog jets, reduce heating efficiency, and corrode components.
Solutions:
- Water Softener: If you live in an area with very hard water, a whole-house water softener is the most effective solution.
- Descaling Agents: For dishwashers and washing machines, regularly run cleaning cycles with appliance-specific descaling products (e.g., citric acid-based cleaners).
- Vinegar: For coffee makers and kettles, a solution of equal parts white vinegar and water can effectively descale.
Trick #4: Mindful Operation & Proactive Monitoring
How you interact with your appliances on a daily basis, and your attentiveness to their performance, plays a significant role in their longevity. Small changes in habit and early detection of issues can prevent major problems.
Refrigerator Door Seals: Keeping the Cold In
The rubber gaskets around your refrigerator and freezer doors are crucial for maintaining temperature and energy efficiency. Worn or dirty seals allow cold air to escape, forcing the compressor to work harder.
How to Maintain:
- Clean Regularly: Wipe down door seals with warm, soapy water to remove food debris and stickiness. This keeps them pliable and ensures a good seal.
- Check for Leaks: A simple test: close the door on a dollar bill. If you can easily pull it out, the seal is weak and might need adjustment or replacement.
- Replace When Worn: If seals are cracked, torn, or no longer provide a tight seal, replace them promptly.
Oven Door Seals: Heat Retention is Key
Similar to refrigerators, oven door seals (gaskets) prevent heat from escaping. A compromised seal means your oven has to work harder to maintain temperature, leading to uneven cooking and wasted energy.
How to Maintain:
- Inspect for Damage: Regularly check the seals for tears, gaps, or brittleness.
- Clean Gently: Wipe them down with a damp cloth, avoiding harsh chemicals that can degrade the rubber.
- Replace as Needed: Worn oven seals are relatively inexpensive to replace and can significantly improve oven performance and Appliance Lifespan Extension.
Paying Attention to Strange Noises or Performance Changes
Your appliances often give you subtle warnings before a major breakdown. Ignoring these signs is like ignoring a check engine light in your car.
What to Look For:
- Unusual Noises: Grinding, clanking, humming louder than usual, squealing, or persistent clicking can indicate a problem with motors, bearings, or other moving parts.
- Reduced Performance: Dishes not getting clean, clothes not drying, refrigerator not cooling adequately, or oven taking longer to preheat are all red flags.
- Leaks or Odors: Any unexplained water leaks or burning smells should be investigated immediately.
- Increased Energy Bills: If your energy bills suddenly spike without a change in usage, it could be a sign an appliance is working inefficiently.
Action Plan:
- Consult the Manual: Often, the owner’s manual has a troubleshooting section for common issues.
- Online Research: Many minor issues have simple DIY fixes or clear indicators of a more serious problem.
- Call a Professional: If you’re unsure or uncomfortable, call a qualified appliance repair technician. Addressing issues early is almost always cheaper than waiting for a complete breakdown.
The Long-Term Rewards of Proactive Maintenance
Implementing these four simple maintenance tricks isn’t just about avoiding immediate breakdowns; it’s about fostering a habit of care that pays dividends over the long haul. By prioritizing cleanliness, respecting load limits, managing water quality, and staying attuned to your appliances’ performance, you’re actively engaging in Appliance Lifespan Extension.
Think of it as preventative medicine for your home. Just like regular check-ups and a healthy lifestyle can add years to your own life, consistent maintenance can add years to the life of your appliances. This translates into:
- Significant Financial Savings: Avoiding the cost of early replacements and expensive emergency repairs.
- Consistent Reliability: Fewer unexpected disruptions to your daily routine.
- Optimized Energy Efficiency: Well-maintained appliances run more efficiently, leading to lower utility bills.
- Environmental Responsibility: Reducing waste and your carbon footprint.
The initial effort required for these tasks is minimal, often taking just a few minutes a month for each appliance. Compare that to the time, cost, and stress of an appliance breakdown, and the choice becomes clear. Make these maintenance habits a regular part of your home care routine, and you’ll enjoy the peace of mind that comes with knowing your essential household devices are running at their best, year after year.
Beyond the Four Tricks: Additional Tips for Maximum Longevity
While the four core tricks form the backbone of Appliance Lifespan Extension, here are a few extra tips to truly maximize your efforts:
- Read Your Manuals: Seriously, they are goldmines of specific maintenance advice for your exact model. Keep them handy, or find digital copies online.
- Level Your Appliances: Especially for washing machines and refrigerators, ensuring they are perfectly level prevents undue stress on internal components and reduces vibrations.
- Give Appliances Breathing Room: Ensure there’s adequate space around appliances like refrigerators and ovens for proper air circulation and heat dissipation. Don’t push them flush against walls.
- Use High-Quality Detergents/Cleaners: Cheaper, low-quality products can sometimes leave residues or be less effective, forcing appliances to work harder.
- Avoid Harsh Cleaners: For exterior and interior cleaning, stick to mild, non-abrasive cleaners. Harsh chemicals can damage finishes and seals.
- Unplug During Power Surges: If a storm is brewing or you know there’s unstable power, unplug sensitive electronics and appliances to protect them from surges. Smart Home Devices: Save Up to $500 on Utilities by 2026 can also offer a layer of defense.
- Regularly Defrost Freezers (Non-Frost-Free): If you have an older manual-defrost freezer, regular defrosting prevents excessive ice buildup, which reduces efficiency and takes up valuable storage space.
- Consider Professional Servicing: For complex appliances like HVAC systems or even some refrigerators, an annual professional check-up can catch issues before they escalate.
By integrating these practices into your household routine, you’re not just performing maintenance; you’re investing in the future of your home and your financial well-being. The goal of adding three years or more to your appliances’ lives is not just achievable; it’s entirely within your grasp with consistent application of these simple, yet powerful strategies.
Embrace the role of a proactive homeowner, and watch as your appliances serve you faithfully for many more years to come, proving that a little effort goes a very long way in the world of Appliance Lifespan Extension.